
I have a tendency to always make my cards look exactly the same as the previous one! I tend to center and layer the same way with only a few variations. With that being said, I was really eager to try a new format without straying TOO far from what I'm used to! I'm still learning after all! I had Howard pick out a past card sketch for me from Card Positioning Systems. He chose sketch #181.

It's not THAT different from what I normally do, but it's different enough! Plus, those 3 squares there would mean that I'd be able to use some of my embellishments! Sketches are really just sources of inspiration. They don't have to be followed exactly, but for me, I pretty much did since I needed the help! This is the card I made using that sketch.
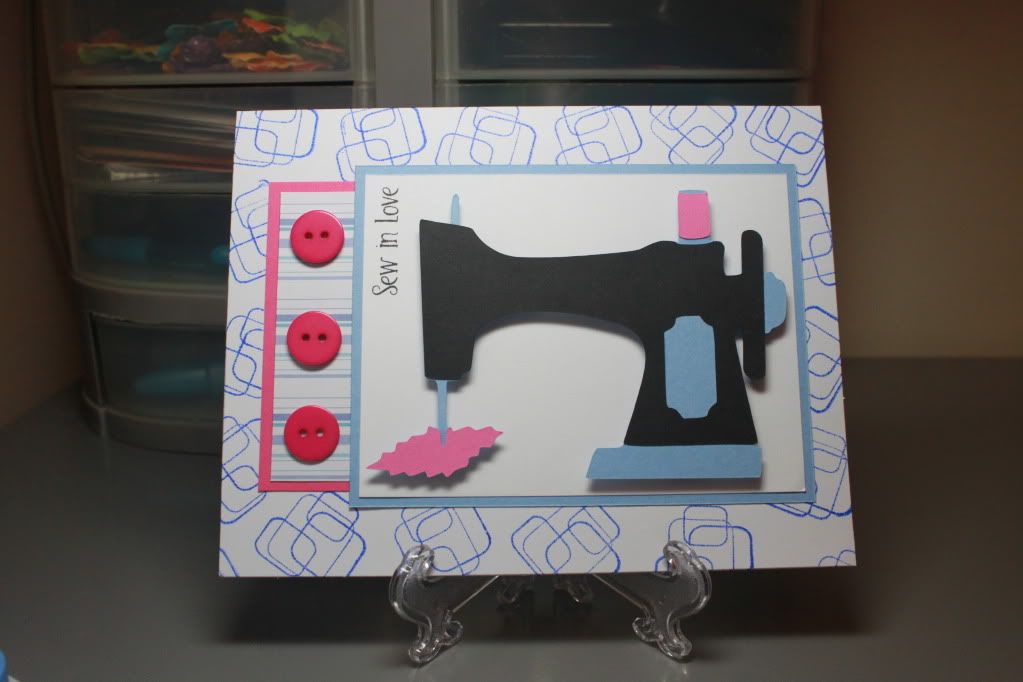
I had the sewing machine cut out already from the Nifty Fifties cartridge. A while ago, I was into just Cricut-ing and piecing together, so I had a few things saved. Since I was using a white card base, I used an Inkadinkado stamp from the Circles and Squares Inchie set to add some blue to the background. I also was initially going to layer the striped paper by itself, but because of the background, it was getting kind of lost, so I added the extra pink layer. I like that there's an extra splash of color since there's only 2 pieces of pink on the sewing machine.
The buttons were the best part! I rarely use buttons even though I have a bunch. I like that the sketch gave me a reason to use 3 buttons, and I think they matched well with the pink paper (all my buttons are from Oriental Trading). I attached them by just swiping the button on some ATG tape from my gun (without pressing the trigger).
I used the foam adhesive squares also from Oriental Trading to give the cut some pop. I stopped doing that for a while because I wasn't using Cricut cuts and also because I didn't want to run out! Well, I won't run out now since I just received my order of 4 extra packs of the 2248 squares for $5 each. Way cheaper than the other brands out there. They may not be as pretty, but they're behind the image and do the job!
The last thing I did was add the sentiment "Sew in Love" from the Pink by Design "Be Mine" set. As you can tell from my previous blog update, I love this company! I was going to try out for the Design Team, but I'm not quite at the point where I can come up with creative projects just yet. I was lured by the prospect of free stamps, but I know I'm just not ready yet! Maybe in the far off future! Right now, I'll just focus on updating this blog as often as I can!
Well, what do you think? I'm excited to be able to use more sketches in the future! It'll help me break out of my same ol' same ol' rut!
Hi Rachel!
ReplyDeleteI LOVE this card! It is a great use of the sketch and your background is fabulous! I saw your question today about the books I made with my kids. For these ones I just used my ATG and ran a strip around the edge of the book to adhere the papers. I cut the paper slightly larger than the book so I could fold them over neatly (you can see this on the pic of the inside covers) and adhered them again to the inside. These books are for fun and I know they are only going to hold up for a few weeks. When I am making them to sell or making them to last longer I always use a better quality notebook (like the composition books) and I use Mod Podge on them. You coat the entire front of the book with it then lay your paper on it. It gives a smoother finish than the ATG does! They are lots of fun to make! Have fun with it and feel free to contact me if you run into any problems with them!
Amber
my3escrapbooking.blogspot.com
This was so cool to see since I picked out the layout and this was the product! I like the raised sewing machine and the shadows from your Ott-lite :D
ReplyDeleteit looks awesome, especially the 3D effect of the piece of fabric that's being sewn. looking at only the sketch I thought you were going to make a notebook looking card but what a pleasant surprise to see the sewing machine instead!
ReplyDeleteHi Rachel, what a pretty card. I like the sewing machine;) image. Great take on the sketch!
ReplyDeleteYou asked how I did the baker's twine frame on my tea party card. I pierced a hole at each of the four corners of the card, and thread the baker's twine through using a dental bridge threader as a "needle". Then I added some glossy accents in a few places underneath the twine to secure it. Hope this helps...;)Kary
@My 3 E Scrapbooking: Thanks so much for the hints! I'm going to try the Mod Podge and the composition notebooks!
ReplyDelete@HowWeird: I'm so glad I have that Ott-lite! I should do a blog entry just on that! I see other people's work, and although their cards are great, the lighting isn't good. It has that yellowish tint. I <3 my light! And I <3 you. Thanks for picking that sketch!
@kay: START A BLOG AND CRAFT! Haha. I really like the Nifty Fifties cartridge for all the fun images like that sewing machine!
@Kary: Thank you! I'm going to bookmark your post so that I can try it in the future! I like the look of a border without actually using a punch or frame. Thanks again!
That is such a cute card! I MUST get that cartridge now cause of that sewing machine!! Thanks for the tips/comments on my blog. I just love your blog and will follow it as well. :) Thanks!
ReplyDelete@ally: Thank you! I really love Nifty Fifties! I think I should've lived in that decade!
ReplyDeleteLove this card! It's soooo cute! Now I know I've got to get this cartridge!
ReplyDelete@Raina: Thank you! I also used it to make my bridesmaids cards (the dress on the mannequin thingie; I forgot what it's called!). I just haven't posted it yet because I haven't actually given it to them ... haha.
ReplyDelete